Building a React Todo App with the Hasura GraphQL Engine

If you are reading this, then it means that you’re probably interested in learning Hasura and React. Well if that’s the case then you just landed at the perfect location. You might be having all sorts of questions like, “What’s GraphQL”, “What’s Hasura?” or more importantly, “Why are we using it?”. Well fear not, everything will be cleared by the time you complete reading this blog. So let’s get started!
This tutorial assumes that you have basic knowledge of the React framework. If you are totally new to React, I would suggest going through the hello world app of React first before continuing further.
The code samples in this tutorial are for the main relevant part only, but if you intend to copy the code then make sure to import relevant libraries and components also and export the Component created. If you want the full code, you can take a look at the code repository for this blog.
What is Hasura?
Hasura is a PaaS with BaaS components. PaaS stands for platform as a service. It allows developers, IT professionals, and business leaders to develop, test, and deploy the next generation of applications in the cloud in a secure, cost-effective manner that speeds time to market and increases competitive advantage.
BaaS stands for Backend as a service. It is a model for providing web app and mobile app developers with a way to link their applications to backend cloud storage and APIs exposed by back end applications while also providing features such as user management, push notifications, and integration with social networking services.
GraphQL, what is all the fuss about it?
GraphQL is a query language for APIs and a runtime for fulfilling those queries with your existing data. GraphQL provides a complete and understandable description of the data in your API, gives clients the power to ask for exactly what they need and nothing more, makes it easier to evolve APIs over time, and enables powerful developer tools.
Hasura’s GraphQL Engine
The Hasura GraphQL Engine is an extremely lightweight, high-performance product that gives you instant realtime GraphQL APIs on a Postgres database. This can be used to quickly build new applications on Postgres or fast-track the move to GraphQL for existing applications on Postgres.
It comes with a UI that lets you create and view tables on your database and make GraphQL queries using the embedded GraphiQL interface.
What we will be building
We will be creating a simple todo app which lets a user sign up or login and then manage todos by (CRUD) creating them, marking them as complete, or deleting them as necessary. Users will also be able to see his all todos. Visit https://reacthasuratodo.herokuapp.com/ to see a demo of what we will be building.
Setting up your developer environment
- Hasura GraphQL server
- Node
- npm or yarn
- create-react-app
- Deploy your Hasura GraphQL engine to a server which will be used as an endpoint to make queries. Setting up a Hasura GraphQL takes at most 1 minute. It can be easily deployed to Heroku via its one-click deploy to Heroku method. Click here to deploy your Hasura GraphQL Engine to a Heroku server. Give your Heroku app a name and click on deploy app.
Your Hasura GraphQL UI will be live at appname.herokuapp.com
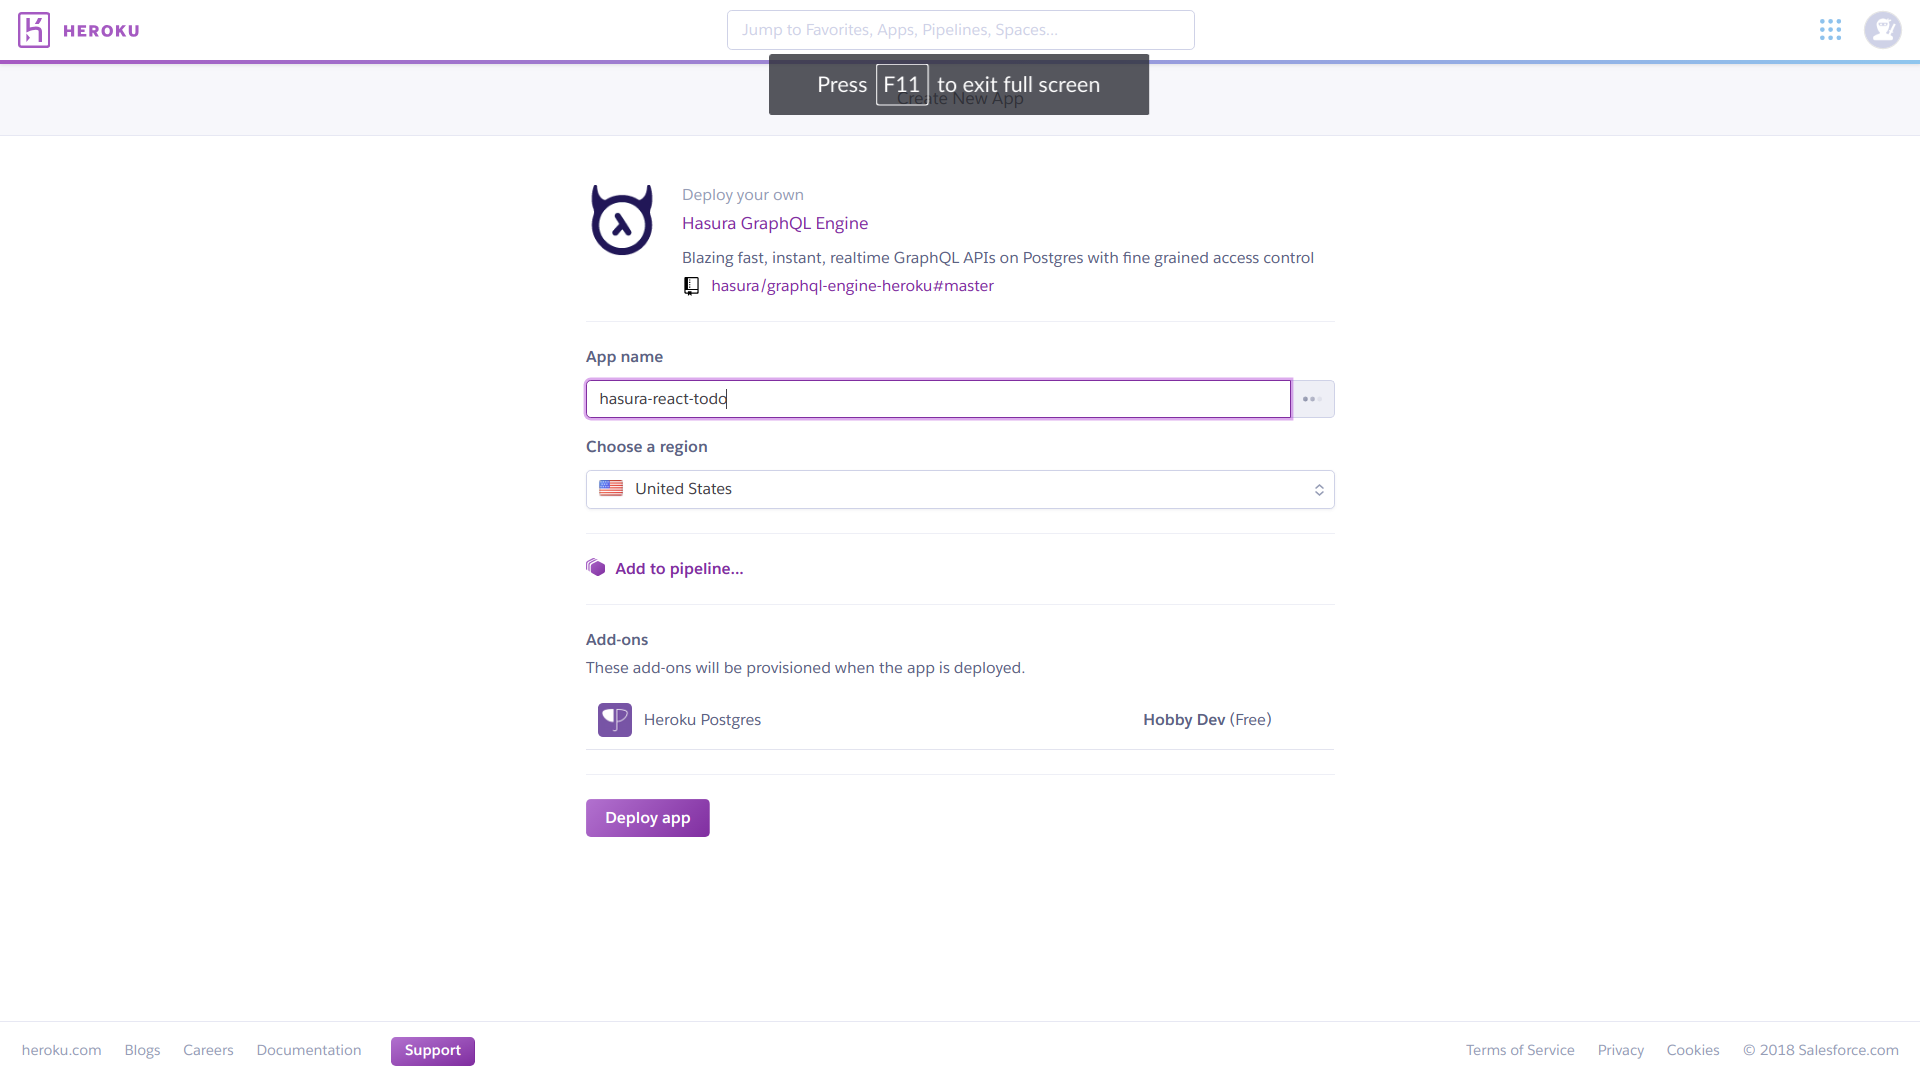
To secure your Hasura graphql server, add an environment variable HASURA_GRAPHQL_ACCESS_KEY on Heroku and keep its value to something you can remember. This access key will be asked whenever you try to login on the Hasura Graphql server.
2. Install node and npm on your system.
- On a Linux-based OS:
curl-sL https://deb.nodesource.com/setup_8.x | sudo bash -
sudo apt install nodejs
The above command installs both node and npm in your system.
- On Windows:
Download the relevant package from here and install it.
3. Install create-react-app (I’ll be using yarn instead of npm)
- create-react-app is a script developed by Facebook to set up a react app with all the necessary directory structure and node_modules.
- Install create-react-app using the following command.
yarn global add create-react-app
This installs create-react-app globally on your system.
Creating a react app
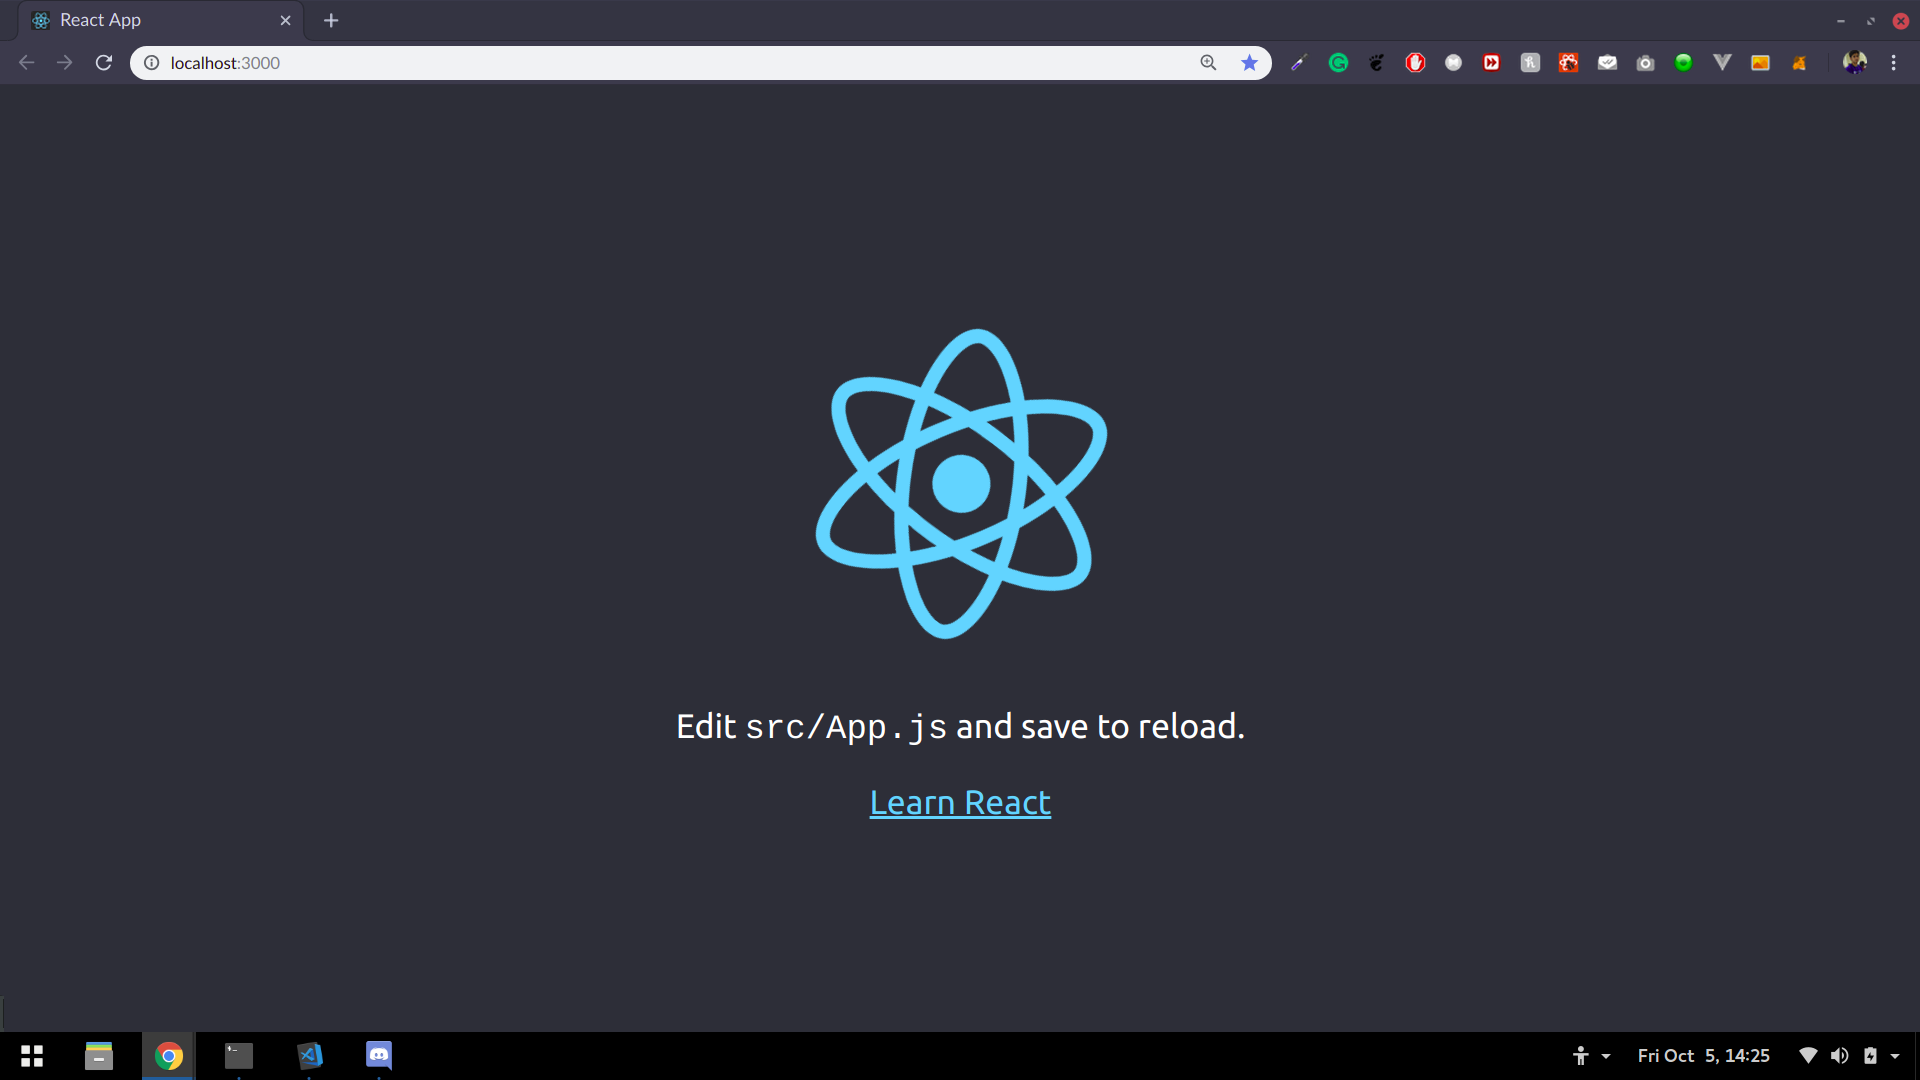
Create a new react app using create-react-app reacthasuratodo
On successful completion of the command, you will see a similar output as in the image. Now open your code editor in the react app directory you just created.

Change your working directory to react app directory and run yarn start. The server will start and you should be able to see a welcome to react screen on http://localhost:3000. This means your React app is running fine.
I’ll be using the react-bootstrap package for the styling so install the package using yarn add react-bootstrap. Make sure to add the Bootstrap stylesheet in /public/index.html. Complete documentation for react-bootstrap package can be found here.
Using auth0 as authentication for the todo app
auth0 is a universal authentication and authorization platform.
To add auth0 to your React app, we will perform the following steps:
1. Sign up on https://auth0.com and create a new application.
2. Add a callback URL in auth0 console.
3. Create an Auth class
4. Create history.js
5. Create a Callback component
6. Create routes
7. Change App.js to include auth urls
8. Render routes instead of App js
Sign up on https://auth0.com and create a new application for your react app. Provide a relevant name to your auth0 application and head over to the settings tab to configure it with your react app.
In settings under Allowed Callback Urls add http://localhost:3000/callback as it will be the callback URL on dev environment after authentication completes.
Now install auth0 in your react app by executing yarn add auth0-js.
auth0 has a great react quick start documentation written on their website to include auth0 in your react app.
Create a new file in src/Auth/as Auth.js. We’ll be creating an Auth class which will handle the authentication.
Copy your auth0 clientID from your auth0 application and paste it in Auth.js. If you are following from auth0 docs then make sure to add localStorage.setItem('sub', authResult.idTokenPayload.sub) in setSession() function and localStorage.removeItem('sub', authResult.idTokenPayload.sub) in logout() function. This will store the user id in local storage.
import createHistory from 'history/createBrowserHistory'

export default createHistory()
Create a file history.js and make its content as an image. Also change App.js to include login, logout, and home buttons.
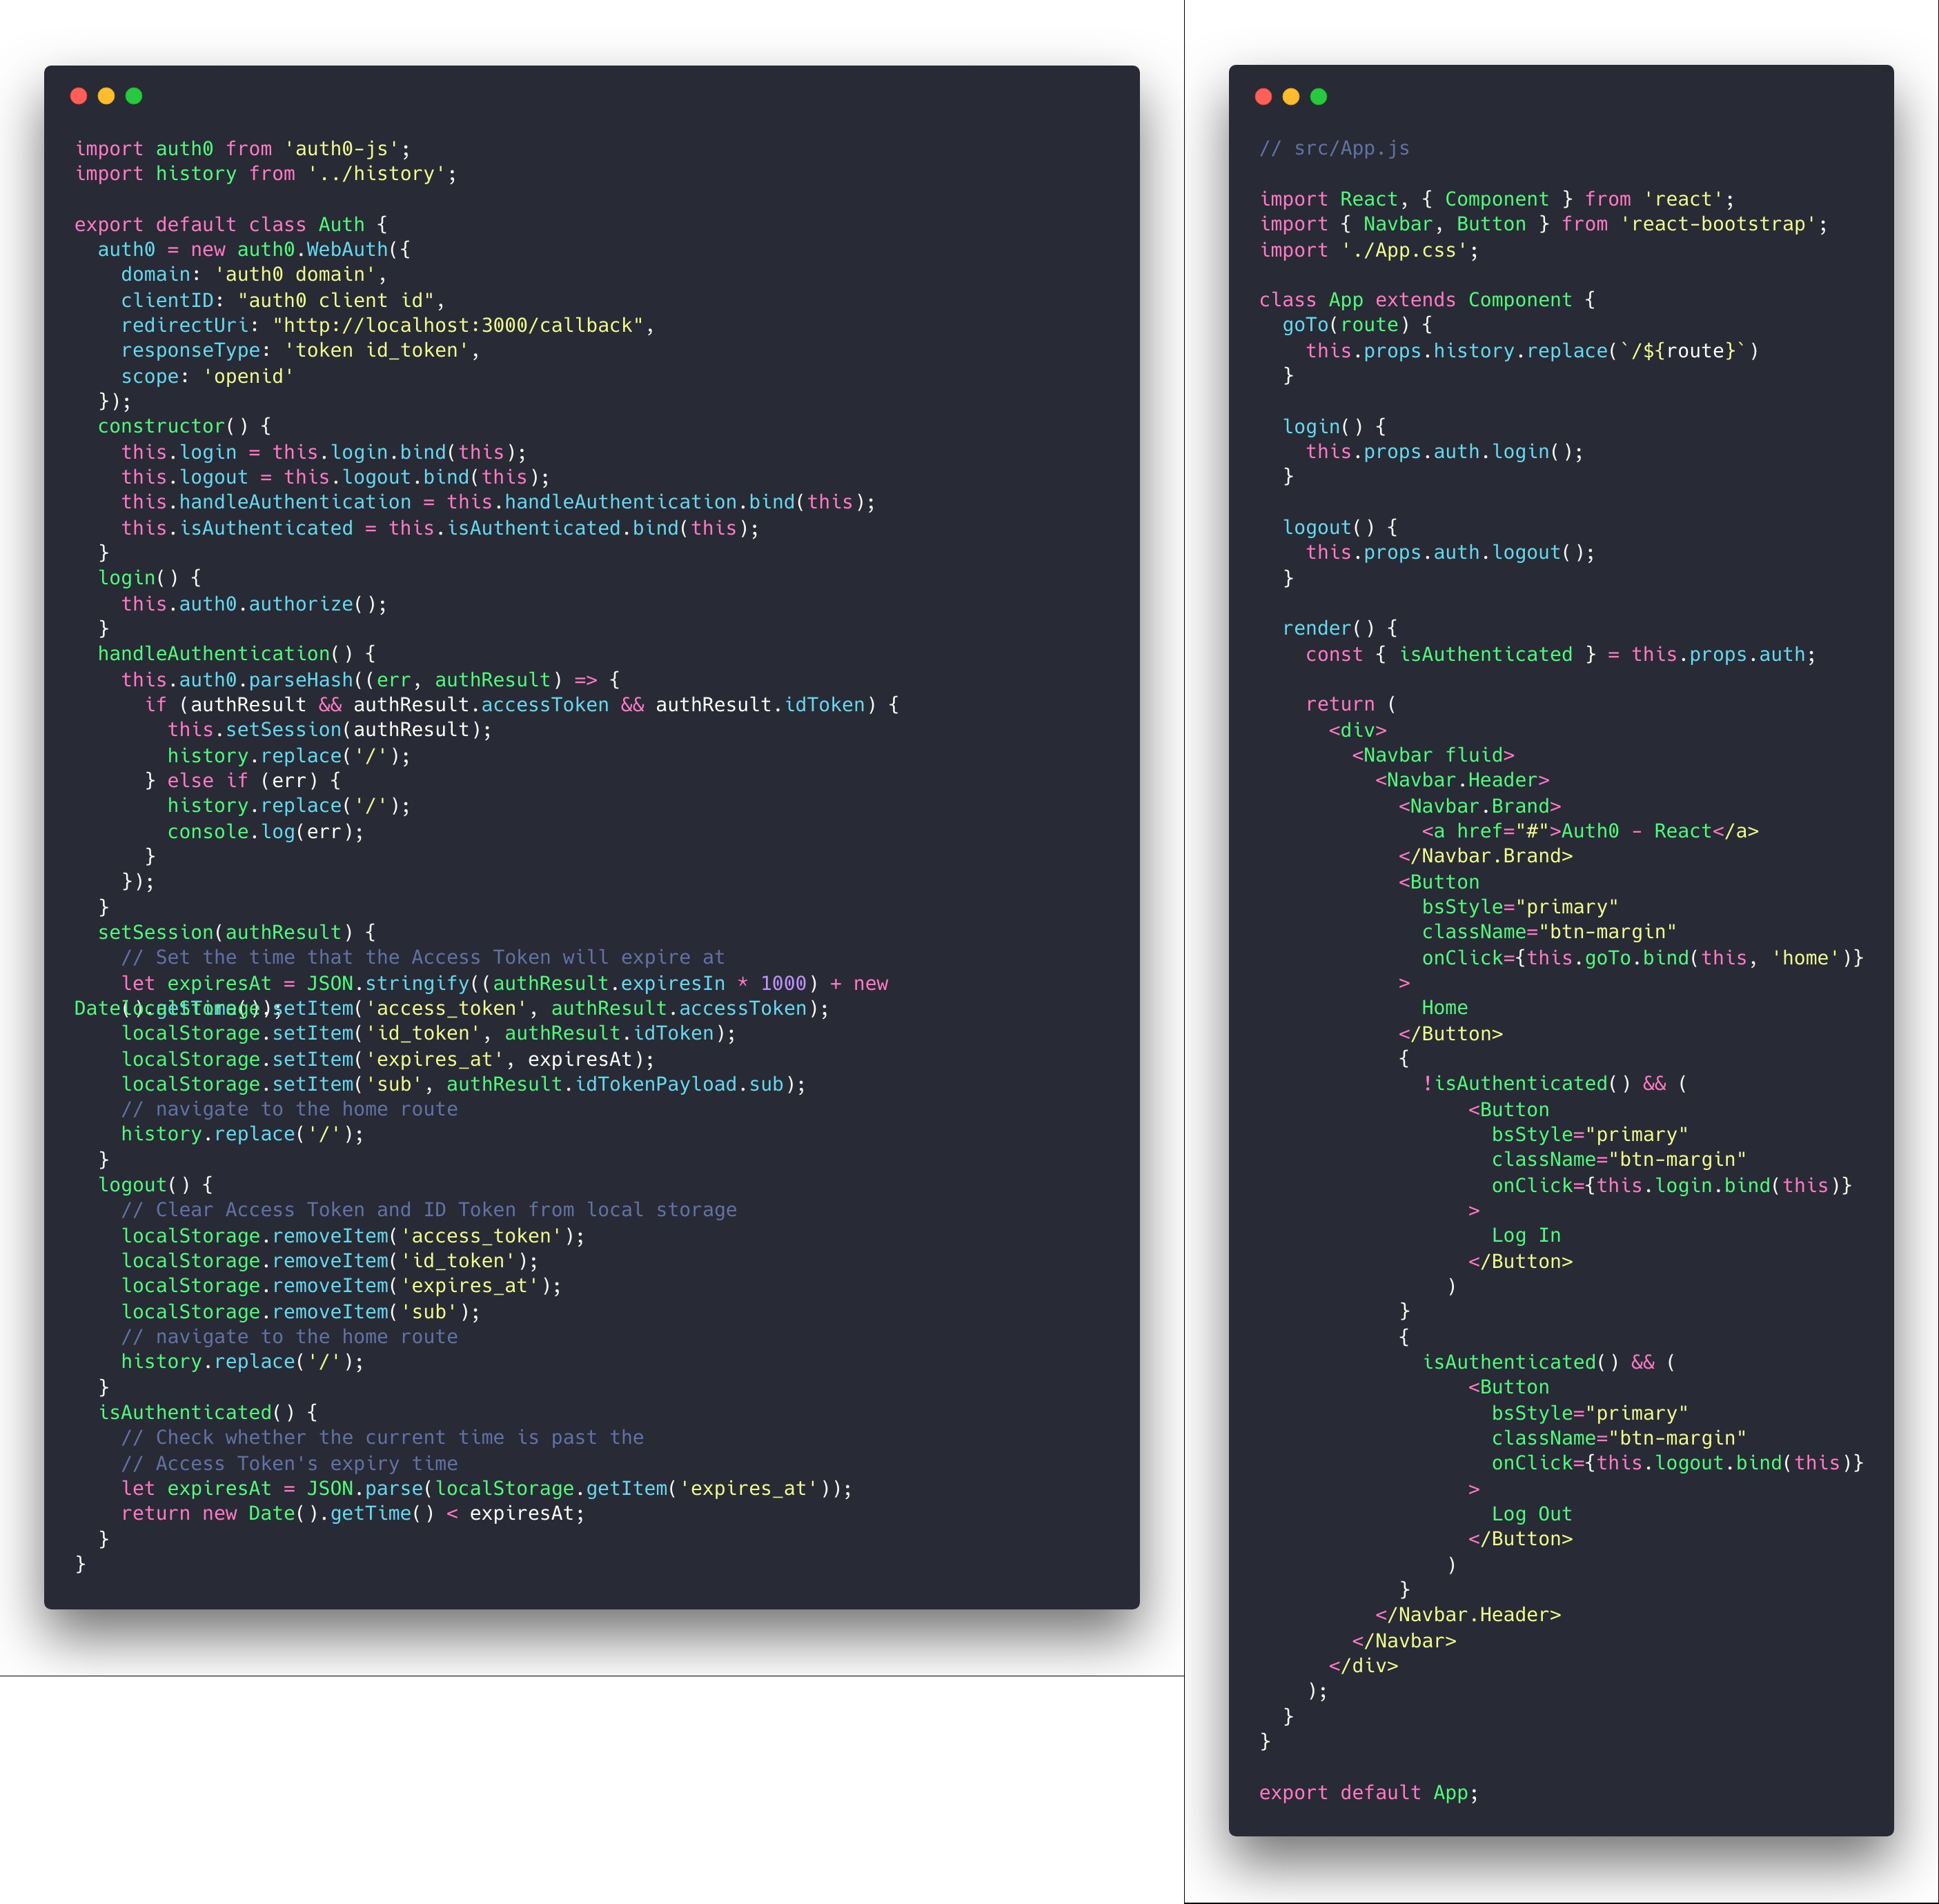
Create a callback.js component which will be shown to the user when authorisation is completed.
Create a routes.js to include different routes on which different components will be shown and a route on which authorisation will take place.
The content for all the files can be found on auth0 react quick start documentation.
Writing queries in GraphQL
There are 3 different types of queries in GraphQL — query, mutation and subscription. GET requests are completed by the “query” while insert, delete and update queries are completed by “mutation”. Subscription listens to any change in event happening, for instance if a new entry is added to a table then through a subscription, it can be notified. This prevents using a GET query all over again.
Create a new table on Hasura API Explorer named todos. It will have the following fields:
1. todo_id: Integer (auto increment)
2. todo_text: Text
3. todo_mark: Boolean
4. todo_user: Text
- todo_id will be the todo number which will automatically increment on every new creation.
- todo_text will store the text of todo.
- todo_mark is a field which will be true if the todo has been completed and false in case it hasn’t been completed.
- todo_user will store the user id of the user logged in.

Add table permissions so that every user can access only its data.
- Create a new
roleuser. - For
insertchosewith custom checksSelecttodo_useras the field, make it_eqtoX-HASURA-USER-ID - For
selectchosewith same checks as ----and select all columns for access. - For
updatechosewith same checks as ----and give access only totodo_markcolumn. - For
deletechosewith same checks as ----.

Writing a GET query
Writing queries in GraphQL is easy. Specify the table name then the fields you want to be in the response. If you want to do a selective search then an order_by can be provided after the table name specification.
A sample query to get all the values in todos table is as follow:
query {
    todos{
       todo_id
       todo_text
       todo_mark
       todo_user
    }
}
The general format for a query is:
query query_name {
 table_name (where, orderby or pagination expression)]{
 table fields in response
 }
}
Writing a mutation
Mutation consists of Insert, Update, and Deletions. The general format for writing a mutation query is:
mutation mutation-name {
  mutation-type_table-name (
    expressions to identify row and changing data
  )
  affected_rows
}
A simple insert query for todos table will look like this:
mutation {
    insert_todos(
        objects: [
            {
              todo_text: "Complete react app",
              todo_user: "auth0|20390123821398"
            }
        ]
    ){
       affected_rows
     }
}
A simple update query for todos table will look like this:
mutation {
    update_todos(
        where: {todo_id: {_eq: 1}}
        _set: {todo_mark: true}
    ){
       affected_rows
     }
}
A simple delete query for todos table will look like this:
mutation {
    delete_todos(
        where: {todo_id: {_eq:1}}
    ){
       affected_rows
    }
}
Now we are ready to create the frontend using React and the query the database to create and utilise todos.
Coding the frontend using React
We’ll be using React Apollo Client to interact with the GraphQL server and make queries. Install apollo client using npm install apollo-boost react-apollo graphql --save or yarn add apollo-boost react-apollo graphql.
There will be the following main components:
1. One parent component wrapping all the components in the apollo provider component.
2. GetTodos component to display all the pending todos to the user.
3. AddTodos component to add a todo.
4. MarkTodo component to mark a todo as completed.
5. DeleteTodo component to delete a todo.
6. GetAllTodos component to fetch all the todos created till now for a user.
Home.jsThe parent component.
This component will act as a parent component for all other components, we’ll wrap the child component in anApolloProviderwhich will enable us to use apollo client to make GraphQL queries in the complete app. ApolloProvider requires aclientprop with aApolloClientobject. This allows us to make authorised requests. Import ApolloClient from apollo-boost and ApolloProvider from react-apollo. Create a ApolloClient object as follows
To use user authentication, pass the user access token in the headers as Authorization. This will let the Hasura know which user is sending a request to the GraphQL server. A separate authentication webhook needs to be deployed to allow token authentication. Deploy the webhook to Heroku or any other service. It’s easy to deploy using Heroku one-click deploy. After that configure theHASURA_GRAPHQL_AUTH_HOOKenvironment variable in your Hasura Server to your deployed webhook URL. Use/auth0/webhookfor auth0 authentication.
const ACCESS_TOKEN = localStorage.getItem('access_token');
export const client = new ApolloClient({
  uri: "GraphQL server url endpoint",
  headers: {
    Authorization: `Bearer ${ACCESS_TOKEN}`,
  }
});

class Home extends Component {
  login() {
    this.props.auth.login();
  }
  render() {
    const { isAuthenticated } = this.props.auth;
    return (
      isAuthenticated() && (
        <ApolloProvider client={client}>
          <div className="container">
            <GetTodos />
          </div>
        </ApolloProvider>
      )
    );
  }
}

export default Home;
2. GetTodos will fetch all the incomplete todos from the database and display them to the user. This component requires the use of React Apollo’s Query component. We first need to write a GraphQL query to fetch all the incomplete todos from todos table. The method to write a query remains the same as explained above. In react, you need to enclose that query in gql``. gql is imported from graphql-tag which lets the apollo client know that the text enclosed within this text is a GraphQL query. To keep the code clean, we’ll create a queries.js and write all the GraphQL queries in it.
export const getIncompleteTodos = gql`{
    todos(
        where: {todo_mark: {_eq:false}}
    ){
        todo_id
        todo_text
        todo_mark
        todo_user
    }
}`;
We’ll use this query to fetch all the incomplete todos. In GetTodos component, we’ll be using Apollo’s Query Tag. Create a Apollo Query and pass the graphql query in it as a query prop. A function inside the Query component will check for the query’s current state (loading), error if present and the data on completion. The data will have all the todos in it, we’ll just iterate over the data and display the relevant content to the user. There should be an option to mark the todo as completed or delete the todo, so we’ll create those components and render along side the data recevied. Finally after all the todos are rendered we’ll give the user an option to add a new todo, we’ll create an AddTodo component for the same and render it next to the Todos shown to the user.
const GetTodos = () => (
    <Query query={getIncompleteTodos}>
        {({ loading, error, data }) => {
            if (loading) return (<h2>Loading... <FontAwesomeIcon icon={faSpinner} style={{ color: 'blue' }} spin /></h2>);
            if (error) return (`Error! fetching todos, trying again. ${window.location.reload()}`);
            if (data.todos.length === 0) return (
                <div>
                    <h3>No Todos Created Yet</h3>
                    <AddTodos />
                </div>
            );
            let count = 0;
            return (
                <div>
                    <Grid>
                        <Row>
                            <Col md={8} mdPush={2}>
                                <ListGroup>
                                    {data.todos.map((todo) => (
                                        <ListGroupItem>
                                            <ButtonGroup className="pull-right">
                                                <MarkTodo todo_id={todo.todo_id} />
                                                <DeleteTodo todo_id={todo.todo_id} />
                                            </ButtonGroup>
                                            <h4>{count = count + 1}. {todo.todo_text}</h4>
                                        </ListGroupItem>
                                    ))}
                                </ListGroup>
                                <ListGroup>
                                    <ListGroupItem>
                                        <AddTodos />
                                    </ListGroupItem>
                                </ListGroup>
                            </Col>
                        </Row>
                    </Grid>
                </div>
            );
        }}
    </Query>
);
3. AddTodo component will be used to send an insert request to the hasura graphql server to add a new todo entry in the database. This component will require the use of graphql’s mutation request and Apollo’s Mutation Component.
export const addTodo = gql`
    mutation($todo_text: String!, $todo_user: String!) {
        insert_todos(
            objects: [
                {
                  todo_text: $todo_text,
                  todo_user: $todo_user
                }
              ]
          ){
            affected_rows
          }
    }
`;
Here we will be using variables in the mutation query which will be received from Apollo’s Mutation component. This component will consist of a form which will take the todo_text input from the user and send that to the mutation query as a variable. Create a Mutation component and pass the name of GraphQL query in mutation prop. Inside a mutation is a function with 2 arguments, the first one being the type of mutation and second being an optional data. Insert type of mutation requires todo_text and todo_user as a variable. Any extra data to be sent along the query is included in a dictionary.
All the variables are included in a dictionary with variable name as key and its value as dictionary. This variable dictionary is assigned to a variables key in the extra data dictionary. A mutation changes the state of the database, this means if we add a new todo to the database then it should be shown to the user in the list of incomplete todos. This is achieved by refetchQueries. refetchQueries is a list of dictionaries with each dictionary containing the name of query to execute on mutation completion. We’ll refetch all the todos whenever a new todo is added to the database.
class AddTodos extends Component {
    addtodo(insert_todos) {
        var todo_user = localStorage.getItem('sub');
        this.setState({ todo_user: todo_user }, function () {
            insert_todos({ variables: this.state, refetchQueries: [{ query: getIncompleteTodos }, {query: getAllTodos}] });
        });
    }
    render() {
        return (
            <Mutation mutation={addTodo}>
                {(insert_todos, { data }) => (
                    <Form
                        onSubmit={e => {
                            e.preventDefault();
                            this.addtodo(insert_todos);
                        }}
                    >
                        <FormGroup controlId="Createtodo" style={{'margin-bottom':'0px'}}>
                            <InputGroup>
                            <FormControl
                                type="text"
                                value={this.state.todo_text}
                                placeholder="Create a todo task."
                                onChange={e => this.setState({ todo_text: e.target.value })}
                          />
                          <InputGroup.Button>
                          <Button type="submit"><FontAwesomeIcon icon={faPlus} style={{ color: 'blue' }} /></Button>
                          </InputGroup.Button>
                          </InputGroup>
                        </FormGroup>
                    </Form>
                )}
            </Mutation>
        );
    }
}
4. MarkTodo component will be used to send an update request to the database for a particular todo to change its todo_mark value from false to true.
export const markTodo = gql`
    mutation($todo_id: Int!) {
        update_todos(
            where: {todo_id: {_eq: $todo_id}}
            _set: {todo_mark: true}
            ){
            affected_rows
          }
    }
`;
In the MarkTodo component, Create a Mutation component and pass the name of graphql query in mutation prop. MarkTodo component is similar to AddTodos except that AddTodo inserts a new entry while MarkTodo updates an exisiting entry in the database.
Pass the id of todo as a variable to update mutation so that the todo_mark value can be changed in the database. Refetch all the todos on mutation completion.
class MarkTodo extends Component {
    marktodo_completed(update_todos) {
        update_todos({ variables: this.props, refetchQueries: [{ query: getIncompleteTodos }, { query: getAllTodos }] })
    }
    render() {
        return (
            <Mutation mutation={markTodo}>
                {(update_todos, { data }) => (
                    <Button onClick={e => {
                        e.preventDefault();
                        this.marktodo_completed(update_todos);
                    }} ><FontAwesomeIcon icon={faCheck} style={{ color: 'green' }} /></Button>
                )}
            </Mutation>
        );
    }
}
5. In the same way as MarkTodo, we’ll create a DeleteTodo component. This will allow a user to delete the todo completely from the database. Everything will be same as in MarkTodo except that we’ll use delete_todos as type of mutation.
export const deleteTodo = gql`
    mutation($todo_id: Int!) {
        delete_todos(
            where: {todo_id: {_eq:$todo_id}}
        ){
            affected_rows
        }
    }
`;
class DeleteTodo extends Component {
deletetodo(delete_todos) {
delete_todos({ variables: this.props, refetchQueries: [{ query: getIncompleteTodos }, { query: getAllTodos }] });
}
render() {
return (
<Mutation mutation={deleteTodo}>
{(delete_todos, { data }) => (
<Button onClick={e => {
e.preventDefault();
this.deletetodo(delete_todos);
}} ><FontAwesomeIcon icon={faTimes} style={{ color: 'red' }} /></Button>
)}
</Mutation>
);
}
}6. Finally we’ll create a GetAllTodos component to show users all the todos he has created till now. It will consist of both completed and non completed todos. This component will use a GET query on the todos table and we’ll order the todos by most recently created non completed todos first. Using conditional rendering in react we can style the incomplete todos and completed todos differently.
export const getAllTodos = gql`{
    todos(order_by: [todo_mark_asc,todo_id_desc]){
        todo_id
        todo_text
        todo_mark
        todo_user
    }
}`;

class GetAllTodos extends Component {
    render() {
        const { isAuthenticated } = this.props.auth;
        return isAuthenticated() && (
            <ApolloProvider client={client}>
                <div className="container">
                    <h2 style={{ 'text-align': 'center' }}>All Todos</h2>
                    <h3 style={{ 'text-align': 'center' }}>Todos in Green Are Completed while in Red are Pending</h3>
                    <Grid>
                        <Row>
                            <Col md={8} mdPush={2}>
                                <Query query={getAllTodos}>
                                    {({ loading, error, data }) => {
                                        if (loading) return (<h2>Loading... <FontAwesomeIcon icon={faSpinner} style={{ color: 'blue' }} spin /></h2>);
                                        if (error) return (`Error fetching todos, trying again. ${window.location.reload()}`);
                                        let count = 0;
                                        return (
                                            <div>
                                                <ListGroup>
                                                    {data.todos.map((todo) => (
                                                        <ListGroupItem bsStyle={(todo.todo_mark ? 'success' : 'danger')}>
                                                            <ButtonGroup className="pull-right">
                                                                {
                                                                    !todo.todo_mark && (
                                                                        <MarkTodo todo_id={todo.todo_id} />
                                                                    )
                                                                }
                                                                <DeleteTodo todo_id={todo.todo_id} />
                                                            </ButtonGroup>
                                                            <h4>{count = count + 1}. {todo.todo_text}</h4>
                                                        </ListGroupItem>
                                                    ))}
                                                </ListGroup>
                                            </div>
                                        );
                                    }}
                                </Query>
                            </Col>
                        </Row>
                    </Grid>
                </div>
            </ApolloProvider>
        );
    }
}Run the server using yarn start. Head over to http://localhost:3000 to test your app.
Final Words
And that’s it, it’s that easy to create a React Todo App with Hasura Graphql Engine. You can extend it to include more features and a better look and feel. Deploy your react app to Heroku or any other hosting service so that everyone over the internet can use it.
You can find the source code for this blog here.
Keep Coding!!!
Useful Resources used while creating the todo app:
1. Hasura GraphQL Engine Documentation
2. React Apollo GraphQL Documentation
3. Auth0 React Quickstart
4. Official GraphQL Documentation